A Handbook for the Recognition & Identification of FAKE, ALTERED, and REPAIRED INSULATORS
by Mike Guthrie, NIA #3297
Reprinted from "Crown Jewels of the Wire", February 2000, page 20
SECTION 1 - REPAIRED INSULATORS
One of the most common alterations to insulators is the practice of repairing
damage. Repairs are not inherently fraudulent unless their presence is
misrepresented by a seller. In many cases, artful repair greatly enhances both
the appearance and value of a piece even when it is known to have been repaired.
Repairs generally take one or more of three forms: 1) Regluing separated pieces;
2) Reconstructing missing/damaged portions; and 3) the concealment of cracks
with liquid compounds.
Reglue Detection
Just about anywhere there is a fracture line completely through an insulator
there is the possibility of a reglue repair (or at least the potential need for
one.) In a carefully reglued piece the repair may be virtually undetectable.
Some of the things to look for in a reglued specimen are:
1) Discoloration. Some adhesives are less than clear when applied while
others may discolor with time after application. Look for discoloration in or
about the fracture seam. Not all discoloration, however, is attributable to
gluing. Occasionally water may seep into fractures, especially in specimens
which have been buried, causing discoloration due to minerals dissolved in the
water. This may give the appearance of a repair where none actually exists.
There are new glue compounds now available which are virtually invisible to the
naked eye. Some repairs using such materials will be apparent upon the
application of ultraviolet (UV) light sources. Different results may be obtained
depending upon the wave length of the light source. Also, care must be taken
when using UV light as it can cause eye damage under improper exposure
conditions. .
2) Glue Residues. If you can see a fracture line feel the line (carefully!).
Some glue may remain in the form of a bead rising above and/or below the
fracture seam, especially on the surfaces on the interior of the piece. There
may also be some smearing or other evidence of dried glue where the glue bead
surfaced during compression of the two pieces and was either wiped off or
smoothed out.
3) Cuts and Reattachments. Occasionally, parts of two different damaged
specimens have been combined to form a more presentable piece. This is
accomplished by making horizontal cuts at the same place on each piece and
gluing the best top to the best bottom. While an admittedly tricky process, when
done properly it can be virtually indiscernible. Look for the same symptoms as
above and pay close attention to areas which most easily disguise the cut such
as mold lines, wire grooves, the surface immediately below protruding skirts,
etc. There may also be a difference in the diameter of the two halves if the cut
was not made precisely. Glue lines, color differentials between the halves,
mismatched mold lines and misaligned threads are other clues to pieces joined by
this process.
4) Vacuum Glue Process. Some reports have been received where a vacuum
process has been used to repair insulators. When successful, the adhesive filler
reportedly completely fills any cracks and is extremely difficult to detect.
Such repairs may be detectable by examining the insulator under light (see
Fracture Reflection, below) or by using a UV light source (see paragraph 6,
below.)
5) Fracture Reflection. It is always recommended that you examine specimens
carefully before buying to make sure there are no hidden fractures, some of
which are very difficult to detect. In dark glass particularly, fractures
reflect light when exposed to a bright light source. Hold the piece under bright
light and rotate at all possible angles to see if there is a reflection
attributable to a fracture. Newer halogen and similarly high intensity
flashlights are bright enough to be very effective in this process.
6) UV Light (blacklight) Usage. Certain wavelengths of UV light may be useful
in detecting regluing and reconstruction efforts. As with other suggested
techniques of repair detection, UV light is not infallible. Certain repairs will
not be revealed with this technique. Because of its ease of use, the most
effective UV light source is probably a portable unit with both low and high
wavelength tubes. The more intense the light emitted by the unit the better but
with higher intensity there is greater cost. Using UV light requires darkness so
some type of portable viewing chamber would be required along with the light
source. This could be as simple as an opaque trash bag. Under either low or high
wavelength UV light sources, insulator repairs may fluoresce vividly in contrast
to the rest of the insulator. Caution is always recommended when using this
technique as improper exposure to UV light may cause eye damage.
Reconstruction Repairs
In many pieces, especially those with very dark colors, high quality
reconstructive repairs are all but undetectable, even upon the closest scrutiny.
In some cases, high intensity or UV light, magnifying glasses, etc. may be
helpful. Some general guidelines to assist with the identification of
reconstruction repairs follow.
1) Weight. If you lift a piece and it feels like it's made of plastic, it
just might be! Pieces with major reconstruction are frequently significantly
lighter than expected as the weight and density of the repair material is much
less than glass. If it doesn't feel "right", inspect closely and ask
questions.
2) Surface Texture and Detail. In all but the best reconstructive efforts,
the texture of the repair area will differ from the surrounding original glass.
Look for smooth spots on a normally rough glass surface and check for rough
spots next to smooth ones. Repairs of newer pieces often do not reflect the same
contour or smoothness of the molded glass. In fact, the repair may be somewhat
"dimpled" compared to the adjoining glass. The detail of a repaired
surface such as embossings, mold lines, etc. may not be consistent with the
molded area. Detail on the inside of the piece, especially petticoats, drip
points, and threads, are often deficient when compared with the original item.
There are many examples of repairs of embossings so just because an embossing
looks good doesn't mean a piece hasn't been repaired in the embossed areas.
3) Sound. If you tap (carefully!) a suspected area of reconstruction with a
hard, solid object (like a nail) it will frequently have a different tone than
the glass. While it does not work in every case, it does have some utility.
4) Discoloration. In lighter colored insulators one of the easiest methods to
identify a reconstructed area is through discoloration of the filler material.
Exact color matches are very difficult to begin with and even if the match was
close at the time of the repair, many filler compounds fade, yellow or otherwise
change color with time. If an insulator has any surface which is a different
shade than the body, it could quite possibly be a repair. (Figure 1.)
(Figure 1.) This piece has a small portion of glass (upper right) and the
rest is plastic. It demonstrates rather radically the
discoloration between
resin and glass which can occur.
5) Ultraviolet Light. Examination of reconstructed insulators under
ultraviolet light may cause the repaired area to fluoresce when the surrounding
glass does not.
Repair Coatings And Tumbling
Under a variety of conditions such as burial of the insulator or exposure to
blowing sand, the surface of an insulator can become etched (swirled streaks or
"rainbow" caused by dissolution of the glass surface by dissolved
ground minerals) or sandblasted (dull, frosted look.) Many different techniques
have been used to cover or remove this "damage".
1) Oils and Wax Compounds. Perhaps the most common treatment is the use of
"Endust" or similar wax/cleaner compounds. Applied to the surface of
frosted or etched insulators, waxes and oils may provide temporary visual relief
of the problem by giving a glossy finish similar to the original glass. A
thorough bath in detergent or light acid will reveal the true character of the
piece almost instantly. When you handle such a piece, it's surface frequently
has the feel of oil or wax and may even smell like the compound used. If it
feels slick and or oily, get suspicious.
2) Polyurethane, Lacquer, and other Finishes. A much more difficult technique
to detect is the application of transparent lacquers, polyurethane, fingernail
polish, and similar materials. When skillfully applied, such surfaces are most
difficult to detect. Some clues to look for include:
- Smoothness of normally
sharp surfaces. Application of any "paint" type coating has a tendency
to fill cavities and collect around mold seams, drip points, etc. If you see
what appears to be dried lacquer or varnish it probably didn't come that way
from the factory. The best way to verify the presence of a suspected coating is
to use a sharp edge such as a knife or pin to see if the material scrapes off
(it helps to have the permission of the owner before attempting this.)
- Run
marks or dried accumulations. As with any painted surface, these substances can
leave runs, droplets, bulges, or thin spots where not carefully and evenly
applied.
- Discoloration. Many clear varnishes and other surface treatments will
fade or yellow with time. If the surface has such an appearance, suspicion may
be warranted.
3) Tumbling. The practice of tumbling insulators has gained popularity in
recent years. Bottle collectors have been doing it for a long time using
practices similar to those used to polish rocks. Tumbling essentially restores
surface luster to glass by mechanically polishing the outer layers to remove
light scratches, burial stain, etching, etc. Short of microscopic examination,
it is difficult to identify tumbled pieces unless they've been tumbled too long.
In such cases, the embossing may be smooth instead of sharp and other edges
which are normally rough or sharp may show signs of polishing. There are
differences of opinion about the ethics of tumbling but currently it is accepted
more as a cleaning technique than an alteration.
Acid Treatment
Certain specimens with etching or sandblasting may be subjected to acid
treatment utilizing hydrofluoric acid which actually dissolves the glass. This
is used to actually remove the damaged surface of the glass to try to restore
surface luster. The practice has also been used to remove carnival glass
coatings to create clear glass specimens which were not actually used in the
field in that color. There is no known detection technique for acid dipping.
This process is extremely dangerous as this acid is one of the most hazardous to
handle and its use is strongly discouraged. With the increased accessibility of
tumblers, this practice is in decline.
SECTION 2 - COLOR ALTERATION
Thermal Alterations or "Cooking"
Much experimentation has been conducted to attempt to change the color of
insulators through heating, either to create new and unusual colors or to
duplicate colors with higher value than the original specimen. While sustained
exposure to the high temperatures of self-cleaning ovens may work on some
pieces, the most common practice is the use of a standard ceramic hobby kiln.
The results of this practice are most visible in the "CALIFORNIA" and
"CGI Co" embossed insulators. The application of heat turns purple
Californias to yellow and some greens to yellow green. While numerous California
yellows have been authenticated by their finders, there is more than ample
evidence that many yellow specimens have been artificially heated to achieve
their color. There is no reliable test to determine whether an insulator's color
has been altered by heat. If there is evidence of overheating (see section 3 on
Mechanical Alterations) there is a strong probability that the color has been
likewise altered.
The problem with some heated pieces, however, is that when the
temperature is carefully controlled, the piece may show none of the signs of
cooking described under Section 3. So, how do you tell the real from the fake?
You can't...only the baker knows.
It has been demonstrated that re-exposure to
the sun or to ultraviolet light may return the "cooked" California
yellows back to purple as well as changing other colors. (For further
information on this subject and for photos of color changes of thermally altered
insulators, watch for upcoming article on Artificially Induced Colors or log in
at the National Insulator Association site www.nia.org.)
Dyes, Paints, Etc.
There are a number of commercially available glass dyes which are
legitimately used for a variety of purposes. Insulator alteration, however, is
not one of them. There is even a dye available which gives the appearance of
carnival glass upon heating but which yields to some of the above tests. There
are a number of ways to identify dyed insulators.
1) Uneven Application. Many dyes are very difficult to apply evenly. Close
examination will normally reveal streaks, runs, dried drips, thin spots,
bubbles, lack of coverage, etc. Many interior surfaces of the piece reveal the
same symptoms of tampering. (Figures 2. and 3.)
(Figure 2. ) Two CD 128 clear Pyrex pieces flank an
altered aqua CD 145
Brookfield.

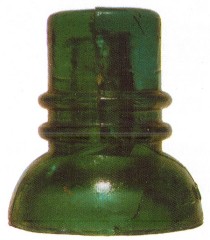
(Figure 3.) A light aqua CD 145 H.G.CO., Petticoat has been changed to a
streaky yellow-green color, a clear CD 214 Hemingray is now cobalt, while the
clear Hemingray CD 154 has been dyed deep yellow green. The dye, however,
is
unevenly applied and shows as dark and light areas all over the insulator.
2) Color Not Listed in Literature. While no reference is perfect, McDougald's
books and price guides are extremely reliable in identifying known colors of
insulators. The authors went to great pains to authenticate colors before
listing them in the books. If you find a piece with a brilliant or unusual color
and it isn't listed in the literature, it is a good candidate for either the
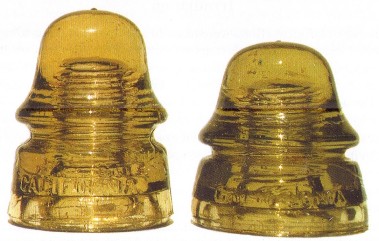
fake farm or find of the year! (Figures 4. and 5.)

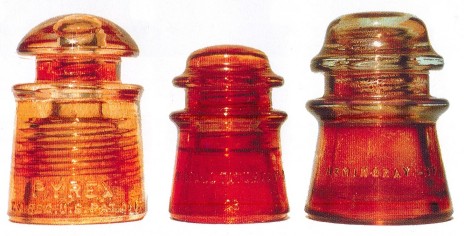
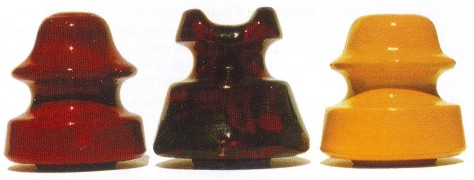
(Figure 4.) The specimens in this photo, a CD 120 in olive green
and a CD 125
in dark yellow green, are not found in the literature
in these colors. The
quality of some is so good as to defy detection
short of scraping the surface.

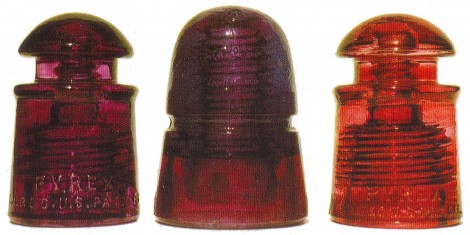
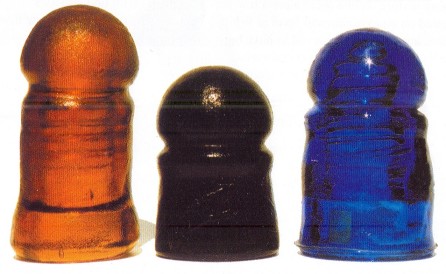
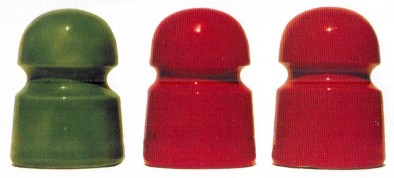
(Figure 5.) This trio of CD 128 clear Pyrex pieces are painted
a beautiful
green, golden amber and red.
3) Ease of Removal. When a coating can be removed easily by simple cleaning
or light scratching it is probably not factory applied as in the case of
carnivals and flashed ambers. Beware, however, that even authentic coatings can
be removed through severe abrasion, acid and other chemicals, and through
constant exposure to severe natural elements.
Non-factory Applied Carnival Glass
The process used in the creation of "Carnival Glass" (also known as
"iridescent" glass) coloration consists of the application of a
metallic oxide to the surface of the glass which becomes a part of the surface
through subsequent annealing or reheating of the glass.
Unfortunately, this
process can be and has been duplicated outside of the original manufacturer's
factory by using a similar process on insulators which were manufactured and
used as clear glass. For the purposes of this document, any such non-factory
carnival glass surface will be referred to as "artificial carnival".
The predominant carnival coating is the "marigold" color having a
rainbow orange appearance in a wide range of intensities. Some insulators, such
as the CD 257 Mickey Mouse, have not been authenticated as being mass produced
by the factory in carnival. As a result, it is generally accepted that nearly
all such specimens in carnival are "artificial carnival." It is
further believed that any Hemingray carnival specimen with a corrugated base (manufactured after the mass production of carnival pieces ceased) is also
artificial.
While it is relatively easy to identify these specific pieces as
fake, the real problem exists when the artificial carnival process is applied to
those CD specimens which are known to have been made in both clear and carnival
by the factory. A small number of carnival specimens in gold and black carnival
coatings have also surfaced, Such pieces were created by the use of ceramic
glazes and firing in kilns. Some porcelain specimens have also been reglazed to
produce carnival surfaces (refer to Section 5 on porcelain alterations).
(Figures 6. through 8.)
(Figure 6.) This set includes a CD 128 Pyrex, a CD 107 Whitall Tatum
and a CD
122 Hemingray. The 128 Pyrex was created
using a dye referred to in the previous
section.
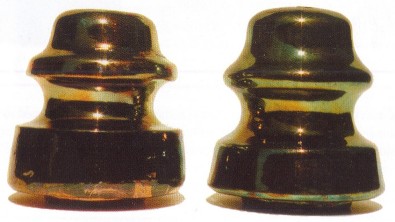
(Figure 7.) This pair includes a CD 251 and 218 Hemingray. There is
no
evidence that either Hemingray was made by the factory in carnival.
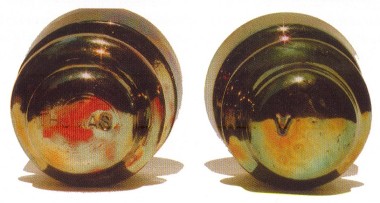
(Figure 8.) The aqua CD 122 Hemingray and CD 203 clear Armstrong
insulators
were treated with ceramic glaze compounds to produce black
and gold carnival
colors respectively.
When a scarce carnival factory specimen is reproduced artificially, it
threatens the integrity and value of every authentic carnival piece in
existence. There is a strong belief that valuable carnival specimens have been
manufactured in the last 20 years, some in substantial quantities. The most
suspect specimens are Hemingray CD's 154, 162, 164, 168, and 230 and Pyrex
specimens in CD's 128, 233, 234, 235 and 320.
In addition, a "silver carnival" coating has been reported on some
Hemingray CD 162 specimens. This effect, however, can be created by using a wire
buffing wheel to apply aluminum to the surface of glass.
Artificial carnival
detection is extremely difficult and sometimes impossible. The most certain way
is to learn which of the CD's and brands were not manufactured in carnival
colors. Beyond that, only the most careful scrutiny will assist and, at best, it
is only occasionally successful.
1) Chipping and wire rubs. During the factory processing of carnival
insulators the hot pieces went from the mold to the annealing process and had
little or no opportunity to sustain damage of any type. Damage or wear of any
type just about had to be sustained after production and as a result of
installation, normal wear and tear, and removal. When inspecting a suspected
artificial carnival, check for any sign of wear or damage including tiny pings,
chips, flakes, rub marks, etc. If an authentic carnival has sustained any of the
above, the affected area will show clean, clear glass at the point of damage.
The carnival coating will be missing. In pieces which have been artificially
altered, any such damage or wear will have the carnival coating on top of the
damage or wear. This is a strong indicator that an insulator which was installed
and used in clear color has been altered. Even the tiniest ping, flake, or chip
can reveal a fake carnival insulator. If the insulator is not damaged or worn,
however, this technique will not be effective in spotting the fraud.
2) Coloration Patterns. Many of the authentic carnival Hemingray styles were
marked by a rather "washed-out" appearance when compared to the
brilliant gold's and dark orange of Pyrex specimens. While there is plenty of
evidence to suggest that some Hemingray styles were deeply colored, there is
equal or greater evidence which suggests that some brilliant Hemingray colors
are artificial. The solution used to iridize Hemingray items was chemically
different than that used by Pyrex, making Hemingray carnival inherently less
intensely colored.
There has been information presented over the years that the
coating of Hemingray specimens occurred by spraying the metallic coating from
the bottom of the insulator up. This is supported by the CD's 118, 142, and
142.4, which are characterized by carnival skirts and clear domes. This is
inconsistent with other specimens which have deeply colored domes. It is
undetermined whether Hemingray used different application techniques with
different CD styles but questions do exist as to why there is such a difference
between the deeply colored items and the lighter ones. In any event, when
evaluating the deeply colored Hemingray carnivals, a high degree of caution must
be exercised.
In the case of Pyrex specimens, there was generally little
suspicion about the authenticity of carnival specimens until the late 1980's. A
number of pieces have been seen since then which bore the signs of artificial
carnival coating. Until supplies of authentic pieces dried up, it was not
financially practical to alter Pyrex pieces. With higher prices in the market,
however, this may no longer be the case and the possibility of frauds is
substantially increased.
3) Soot and dirt. Many authentic carnival pieces were used adjacent to
railroad routes and were, as a result, prone to accumulation of coatings of soot
from locomotive exhaust. These coatings are often quite difficult to remove.
When a piece is acquired with soot deposits, it tends to add credibility to the
piece's claim of authenticity. While certainly not absolute evidence, it is
another tool to help in the identification process.
4) Dump specimens. Many specimens of Hemingray carnivals were found in the
factory dump. Many of these specimens display the characteristic etching of
buried specimens and at least some damage consistent with being dumped. Both are
possible clues to establishing authenticity.
5) Styles. It is generally presented that any Hemingray specimen with a
corrugated base was not made in carnival by the factory as that style is much
newer than those made during the carnival "era". Authentic
"carnival" was produced by Hemingray predominantly during the period
1932-1936. Pieces produced much thereafter must be suspect.
There are some known
carnival specimens of newer styles alleged to be authentic but indications are
that they are samples or were only experimental and were not mass produced for
sale. This includes CD's 137, 155, 160, 214, and perhaps 257. With any such
specimen the utmost caution must be exercised as authentication would be nearly
impossible beyond the first generation of owners. In all cases, despite the use
of known techniques to authenticate carnival insulators, extreme caution must be
exercised in the investment of significant amounts in the more costly carnival
specimens unless their authenticity can be established to your satisfaction.
Irradiation
A number of different efforts were made to alter insulator color using
devices which reacted with the glass upon exposure. This includes Cobalt-60
medical radiation, linear accelerators and other experimental scientific
devices, and various X-ray machines. Insulators exposed to any such device are
referred to as "irradiated."
1) Appearance. The colors resulting from irradiation depend upon the original
color of the insulator (and the mineral composition of the glass), the type of
device used, and the length of exposure. Many samples turned a variety of amber
shades as if they were burned. In some cases, purples became deep violets, pinks
became purple, and greens turned blue. There is probably an infinite number of
colors which may result from such a process but the ambers from clears and
purple shades from pinks and SCA's are the most numerous examples of irradiated
pieces which have been identified (For examples of such specimens, see the
upcoming article on Artificially Induced Colors or check photos at www.nia.org
on the Internet.)
2) Detection. Other than experience with known and artificial colors, and
reference to the literature, there are no external methods to identify
irradiated pieces. Heating and/or exposure to the sun causes some irradiated
pieces to return to their original colors but the conversion is often times only
partial and may be very slow. This is not known to work in all cases and
dependence on others' knowledge may be the only reliable method to identify
irradiated specimens.
SECTION 3 - MECHANICALLY ALTERED INSULATORS
Heating
Using techniques similar to those described under "Heating" in
Section 2, the actual shape of insulators has been modified by heating. Some
pieces have even been represented as new or rare variations of existing CD
numbers as a result of dimensions which have been intentionally altered by
heating, either by shortening or by lengthening the piece. There are also quite
a number of specimens that came from the factory with heat related distortions
so it can be very hard to tell whether a heat distorted specimen is factory or
altered. About the only reliable method to determine whether any piece has been
"cooked" is through evidence of "meltdown". In the most
severe case, the insulator will get so hot as to become shorter with bulging
dome and skirt, pinched wire groove, etc. Under slightly lower temperatures, the
entire structure of the insulator may be unaffected except, possibly, for the
base.
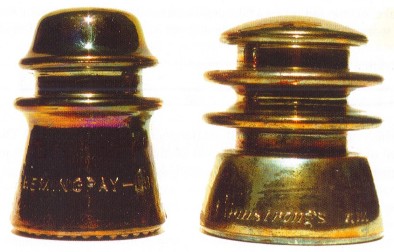
(Figure 9.) These are both CD 162 California insulators. The one on the
right
displays the obvious signs of meltdown both in it's squattiness and
the flat,
dull characteristics of both the skirt and petticoat.
When an insulator is heated sufficiently to cause shape distortion, the
surface of the insulator which rested in the kiln may develop a flatness with a very dull finish if it had been sitting on
a flat surface such as a cookie sheet. Some specimens which were heated were
sitting on a wire grid so telltale crosshatching may be an indicator of
tampering. Many Maydwell insulators have this grid marking but it cannot be
determined to a certainty that it is a factory feature or a post manufacture
alteration. Both possibilities may be true. Almost all insulators with smooth
bases were made with nicely rounded and glossy skirt edges. When a piece has a
flat, dull skirt base, or a very coarse base surface, it is a good bet it has
been reheated. Even pieces which have been manufactured with flat bases are
still glossy rather than dull. Most pieces which were subjected to heating
(especially California's and Denver's) came with rounded skirts so any
noticeable flatness is a definite indication of tampering.
Some insulators have also been heated in an oven, then dropped into cold
water to create a "crackled" effect. This causes virtual total damage
to the piece yet specimens have been known to sell for very high prices.
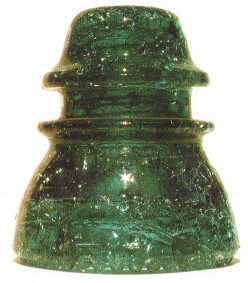
(Figure 10.) This Hemingray 42 was crackled
by heating and dousing in cold
water.
A final technique used to alter insulators using heat is to heat them to a
temperature where their structures can be manipulated. Some unusual designs have
resulted from this practice. At one time, numbers of these pieces have been
marketed as "lnsulcats" They were made by heating in a kiln and then
being stretched and manipulated into the shape seen here.
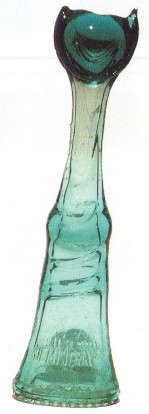
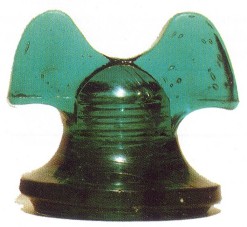
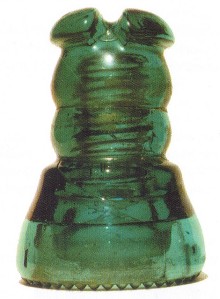
(Figure 11.) "lnsulcat" made
from a CD 122 Hemingray 16.
Grinding, Cutting And Polishing
The technique of grinding has been used both by the factory and by those who
would alter an authentic insulator. The most obvious grinding of glass by a
factory is seen in specimens manufactured by The California Glass Insulator Co.
("C.G.I.Co" and "CALIFORNIA" embossings.) The practice was
used to remove glass burrs from mold over-castings. The techniques were applied
frequently to skirt edges and to the bases of the "egg" strain and
Brown's pony/mine (CD 187) styles. On the other hand, grinding and polishing
have been used by collectors to create a wide variety of new and different
shaped pieces, to improve the appearance of damaged areas, and/or to remove or
modify embossings. Specimens have been altered by grinding down exterior skirts,
drip points and other features to make specimens different from or rarer than
others. In addition to grinding, cutting off parts of the insulator or modifying
the insulator by creating new features such as saddle grooves have also been
tried. Polishing was done as a follow-up to cutting and grinding to remove and
conceal the striations caused by the processes. Some polishing of insulators was
also done in order to improve an undesirable surface condition such as
sandblasting or etching.

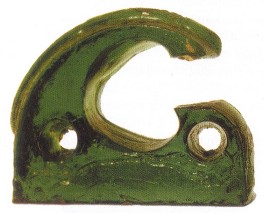
(Figure 12.) After removing the skirt and
lots of grinding and polishing of a
CD 288,
the "rocketship"-shaped insulator was produced.
(Figure 13.) This CD 257 has had the
bottom of the skirt cut off and polished
giving it a substantially different
appearance than its intact cousin.

(Figure 14.) This piece is a CD 121 Hemingray which
has had a saddle groove
ground into the dome and
polished. This style never had such a saddle groove.

(Figure 15.) This piece once was a CD 317
which has had the lower half cut
off
and the base polished. To those who had never
seen a complete specimen, this
could easily
be construed as a complete insulator.

(Figure 16.) In the early days of the hobby
a CD 122 Hemingray was cut off
at
the lower wire groove and a factory
CD 241 was attached to the top by
way of a
short pin. The pair was referred
to as a "Baby Muncie" as it bore
resemblance to a CD 303/310 combination.
Besides intimate familiarity with known CD styles, there are two primary
detection techniques for ground and polished specimens; 1) the presence of
striations or contour disruptions; and, 2) dull finishes. It is extremely
difficult to grind and polish glass to a degree which is undetectable. Most
ground spots have the striations (lines) which are typical of any ground
surface. Grinding also tends to leave a flat spot or series of adjacent flat
spots since the grinding wheel is usually flat itself. When any such striations or flat spots are present,
it is time to get suspicious. When an embossing is removed and the area where it
would normally have been present is highly polished, the altered area often does
not conform with the contour of the rest of the insulator and is sometimes not
as glossy. Close examination may also show very fine striations where the
polishing wheel was applied. A slight depression may also exist where the
embossing once was. Sometimes, however, resin or lacquer was used over the
ground area to disguise the removal. Glass is very difficult to polish to the
degree of the molded item. If you have a specimen which has a slight dullness
where it should be glossy and embossed, it may have been altered by grinding and
polishing.
Cut And Glued Specimens
In the case of repaired pieces, cutting and regluing were done to create a
presentable specimen out of two damaged ones of the same CD, color, and
manufacturer. Using the same techniques, a number of creative new specimens were
created by using tops to one CD or brand and bottoms to yet another resulting in
a "hybrid" specimen of two different CD's, brands, colors, etc. These
are frequently amusing, unusual, and interesting but are nonetheless to be on
the lookout for. Many are so expertly done as to defy easy detection thereby
giving the impression of being a new style. The identification of such altered
pieces is easily achieved with a thorough knowledge of existing CD styles.
Without such knowledge, use of the techniques described under "Reglue
Detection" in Section 1 should assist in the detection of this type of
alteration.
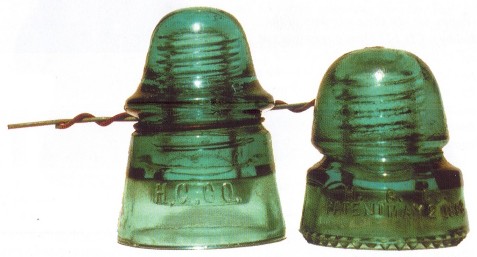
(Figure 17.) This "hybrid" specimen (left) has the top to a CD 162
glued to the
base of a CD 145 H. G. CO. The second hybrid is the opposite of the
previous
piece. This is the top of the CD 145 glued to the base of the CD 162.
(Figure 18.) This interesting hybrid has fooled quite
a few collectors. It
consists of the top of a
CD 130 Cal. Elec. Works glued to a base from a
CD 121
unembossed Duquesne with the four vertical ribs.
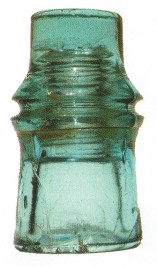
(Figure 19.) This piece was made by gluing
the top of one CD 210 Postal to
the base
of another CD 210 Postal, thus adding additional height.
Sandblasted Specimens
Occasionally, some pieces will show up which have a sandblasted or grainy
texture. While there were a few such specimens with odd surfaces created on an
experimental level at Whitall-Tatum/Armstrong, all other such pieces are
generally believed to have been either naturally or artificially sandblasted to
create an unusual surface. These pieces are essentially damaged and should be
valued accordingly.
Thread Removal
There are a few authentic specimens with exterior shapes in both threaded and
unthreaded styles (e.g. CD 133 & CD 728.4). To enhance the value of the
threaded types (or to create "new" specimens altogether) some persons
have removed the threads utilizing a boring device and subsequently attempted to
polish the remaining smooth hole. The most reliable method of detection is to
look for the same telltale signs as described under "Grinding /
Polishing", above, as well as to be educated on the known threadless
styles. Specimens which have been altered with this technique generally have
larger pinholes than a normal threadless and do not have the typical pinhole
taper of authentic pieces.
SECTION 4 - FABRICATED
INSULATORS AND FACSIMILES
There are many insulators and items appearing to be insulators which have
been fabricated for uses other than commercial insulator applications. The
results of these efforts are usually clearly marked, represented, and
identifiable as such. In a few isolated instances, some pieces have been
fabricated to intentionally appear to be a real insulator.
The specimens which
are openly manufactured as facsimiles include special, private issues for the
purpose of profit such as the LSV threadless Columbia series, and miniatures
such as Hemi-19's, Holly-City, etc. Other facsimiles are made to commemorate
certain events or other purposes such as the NIA annual conventions, Telephone
Pioneers, and Human Services and the Cobalt and Ruby Red "VTS"
Industrial ponies. Still yet, some miniatures were made by the insulator
manufacturers as promotional samples. Some of these miniatures have been
reproduced and care must be taken to distinguish between the real and reproduced
specimens, usually by checking the level of detail between the two. Also in
circulation is a variety of CD 102 pony style threaded pieces made in the late
1960's or early 1970's which may appear to be authentic but which are not. Most
specimens are amber, with some cobalt examples in circulation, all of which are
characterized by a very coarse, dull finish, distorted shape, and irregular
threads. These pieces are particularly crude and easy to spot. In the past
decade, a number of other pieces have surfaced which resemble both known and
unknown CD specimens but which are highly suspect. This includes a variety of
pieces in known CD numbers which were made of colors which were previously unheard of.
Unfortunately, there is no reliable, conclusive scientific method to fully prove that the pieces are not authentic.
Nonetheless, extreme caution must be exercised as such specimens are so well
made as to closely resemble authentic items.
(Figure 20.) Fabricated "Ponies"
Additionally, a number of
"gag" 'insulators' have also been made in a wide variety of styles and
materials. A large number of copies of insulators have been recently
manufactured in resins of extreme colors. Some are quite bizarre and amusing. If
you see an unusual piece and color which does not appear in any publication,
consider the possibility that it may not be authentic. Of course another clue is
that these resin pieces are very lightweight compared to glass pieces. With the
presence of real production plastic insulators, however, one might be misled to
believe that these were actual production pieces.
(Figure 21.) This piece is a full sized resin
replica of the Cutter tree
insulator.
(Figure 22.) This piece is also made of resin and
represents a CD 143 No Name
in deep purple.
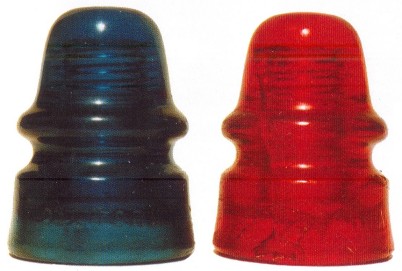
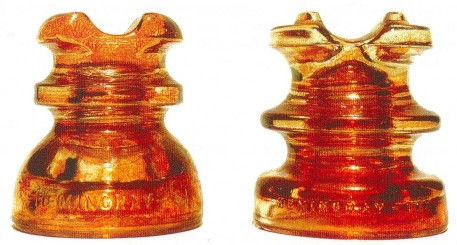
(Figure 23.) Two CD 161 Californias in peacock blue
and red, both of
which are unlisted colors.
SECTION 5 - ALTERATIONS TO PORCELAIN INSULATORS
Many of the same alteration techniques previously described for glass
insulators also have been applied to porcelain insulators. This section will
deal with those alterations which are specific to porcelain insulators.
Color Altered Specimens
In terms of color alteration, two primary techniques have been identified.
First, there are a number of specimens floating around the hobby which have been
reglazed. This process involves the application of standard ceramic glazes to
existing pieces which are then refired in a kiln. This can produce glazes of
high quality which are difficult to discern as not authentic. In the case of the
three ponies in the photo below, the glazes are very uniform and smooth. Absent
the gold leaf marking left by the reglazer, the only way to tell they are
altered is to look inside the skirt and pinhole of the insulator which retain
the original white glaze and which reveal the sloppy over brushing of the new
glaze onto the original white surface. Had this area been also reglazed, it may
be impossible for the average collector to detect the alteration. In the next
photo (Figure 25.) there is a strange purplish piece along with a mottled red
and black specimen. The glazes in these two are not uniform like the previous
photo and can be identified as potentially altered by the mottling and crudeness
of the glazes. Unfortunately, there are some pretty crude factory specimens
which are equally uneven and blotchy so this is not a fail safe indicator. If a
color appears to be to good to be true, it just may be.
(Figure 24.) Reglazed white porcelain insulators.
(Figure 25.) Reglazed white and brown porcelain insulators.
The second method of color alteration actually involves the use of metallic
oxides similar to those used in "carnivalizing" glass insulators.
These materials are readily available in the ceramic hobby. The following photo
shows two insulators which were treated with such metallic coatings and fired in
a ceramic kiln. Because the inside skirts and pinholes were coated, it is not
easy to discern the original color with a visual inspection.
(Figure 26.) Brown porcelain insulators with carnival coatings.
Fabricated Specimens
It is relatively easy for even novices to create a ceramic mold from which a porcelain insulator replica could be cast. It's then a simple matter of firing and glazing to produce a convincing counterfeit. The photo which follows is a pony style porcelain piece marked: BOSTON BOTTLE WORKS. It has what appear to be standard threads and is similar in dimension, color, and shape to known porcelain specimens. Only well informed collectors are aware that Boston Bottle Works only made glass insulators so it would be easy for beginners to be fooled by this piece. In addition to the unsubstantiated embossing, the crude texture of the porcelain and glaze and the thin skirt walls could give rise to suspicion but probably only to experienced porcelain collectors. The best guide for detecting such frauds is access to and use of books on porcelain which identify known embossings, colors and styles.
\
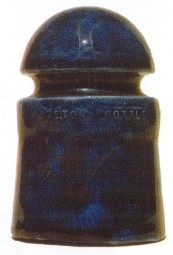
(Figure 27.) Fabricated porcelain insulator
marked "BOSTON BOTTLE WORKS"
Repaired Specimens
As with glass insulators, a variety of methods have been employed to repair porcelain specimens. The techniques include regluing, filling chips and gaps, and major reconstructions. Because of the relative ease of use of the wide range of putties and other filling compounds, porcelain repairs are much easier to achieve than with glass. Covering the repairs is also easier with porcelain than with glass. From painting to a complete reglazing, repairs are easily concealed if done carefully. The only techniques to discover such repairs are to scrutinize the entire insulator for any differences in surface color and/or texture, or irregular shapes such as the crude reconstruction seen in the upper half of the following photo.
Hybrid Multipart Specimens
Porcelain multipart insulators consist of a series of from two to four shells cemented together with different materials including sulfur and Portland cement.
Two primary types of alterations are possible with these pieces. The first is to replace a damaged skirt or skirts with undamaged matching skirts from another insulator of an identical style. This would result in an "authentic" insulator insofar as it consisted of original factory parts but it would still be considered
altered and would not retain the value of a completely original specimen. The second alteration which has been detected in multipart insulators is the mixing of skirts from different insulators to create a hybrid which is different from known styles. While this may be done as an amusement, the potential for such pieces to filter into the market and be misconstrued as authentic is very real.
In the early Locke specimens, where sulfur was used as a cementing agent, it is not too difficult to detect skirt swaps as producing the same sulfur cement is not easily done. In specimens with standard Portland cement seams, it can be extremely difficult to detect replacements especially if the piece has been exposed to weather. When there is a significant difference in color or texture of the cement between different skirts it is not conclusive, but the possibility of alteration should be considered. In the case of hybrid pieces, reference to literature which documents the existence of known styles is the best protection.
Most styles that are published have been traced to catalogues and journals which corroborate their authenticity. Once again, knowledge is the best guide.
CONCLUSION
It is not the intent of this work to identify every non-authentic item and variant ever produced, a task which would be impossible. Rather, it is designed to alert collectors to the presence of such items, even in the most remote of places, and techniques which can be utilized to avoid being deceived by altered insulators. The thorough review of the information in this and other books and articles on related subjects, and consultation with
trusted experts in the hobby, are the best methods to protect oneself from a costly mistake as well as to identify any person who may be in violation of the standards of ethical conduct of the National Insulator Association. There are most certainly other alteration techniques which have been tried but are not documented herein and certainly some which have yet to be attempted. There must be no mistake, there is no substitute for knowledge when dealing in the realm of fake, altered and reproduced items in any hobby and ours is no different. As I am fond of saying: "A question is always cheaper than a mistake". Most experts in the hobby are delighted to help with your questions.
I would like to extend a special thanks to all those who have contributed information and/or specimens to make this book possible. Your commitment to the education of the hobby is commendable.
Happy Collecting!
Mike Guthrie
© 1998, 1999 Permission to reprint must be obtained from the author. Photos by Mike Guthrie.
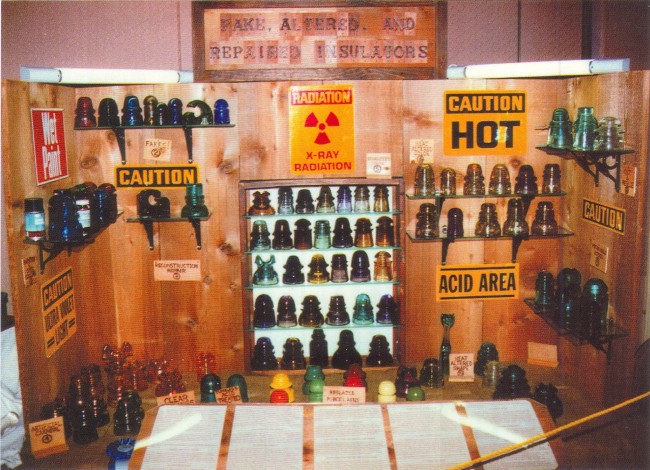
FAKE, ALTERED, and REPAIRED INSULATOR DISPLAY
assembled by Mike Guthrie to help educate collectors.
| 
)
)
)
)
)
)
)
)
)
)
)
)
)
)
)
)
)
)
)
)
)
)
)
)
)
)
)
)
)